With this guide, “How to Install Windows Server 2019”, you will be able to install the server easily on a physical PC or virtual machine. We will have mentioned everything steps by step to make your job easy. Installing steps are very simple and easy, like installing other windows OS. However, some users never installed it before, so this tutorial will be helpful for them.
What is Windows Server?
Before moving on to the window server installation steps, you should know this term. To understand this term, first, you need to understand what the server is? Although server itself is an extensive term, in simple words, it acts as a system administrator in-network who handles all activities to send and receive data between client devices to the server.
Therefore, windows server is a particular operating system developed by Microsoft to handle and control server hardware devices. The first version was released back in 2003, and 2019 is the latest version with lots of features and improvements. Whenever Microsoft releases a new version, it updates with new features and also removes previously reported bugs. Installing the latest version saved many headaches and helped the server to work smoothly. And also boost the performance of the system.
To install it on a PC, you need to download the ISO file and make it bootable on USB. You can download it from here. Warning note: Don’t download a file from any other 3rd party website; the file can be infected with the virus. Step by step detail is given here on how to make USB bootable. And if you don’t like to install using USB, you can use DVDs for installation. For this guide, I will use windows server 2019 that was released on 2 October 2018.
However, you can install any version whether it is window server 2012, 2008, or the latest version. The procedure and steps are the same as this (It might be slightly different). Furthermore, installing a windows server on windows10 is also possible; for that, you can use Oracle virtual box. Additionally, also check out the guide on how to install Ubuntu Linux on windows.
Minimum requirements for Windows Server Installation:
- Processor:
1.4 GHz to handle or execute a 64bit set of instructions.
- RAM:
At least 512MB, but 2 GB is recommended; for high performance, 8GB is excellent.
- Hard Disk Space(ROM):
At least 32GB disk space, but more is highly recommended.
- Graphics:
SVGA graphics card with 1024 x 768 resolution.
- Network Requirement:
Ethernet cable with gigabit transfer speed.
Installation and Configuration Steps
Step 1:
After creating a windows server bootable in USB. Connect it with your computer and restart the system.
And press F12 continuously and then press any key.
A window will start loading the files.

Windows’s setup is running for installation.

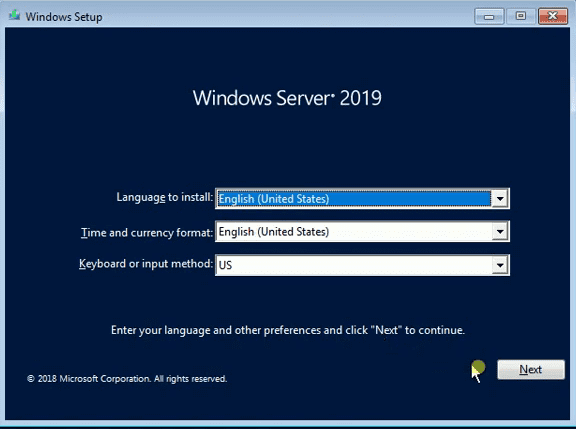
Step 2
Select desired language, time, currency, and keyboard for installation and click on the Next button.
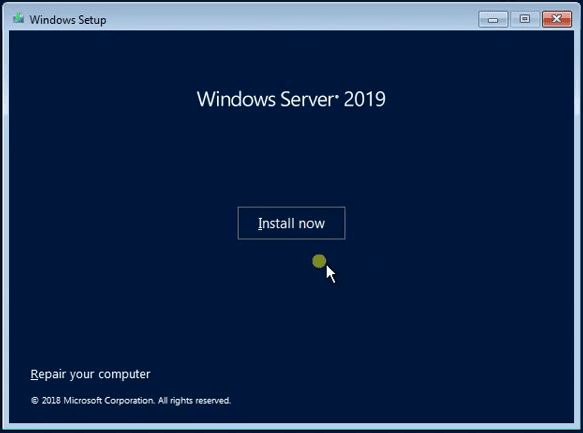
Step 3
To start windows server 2019 installation, click the no Install now button.
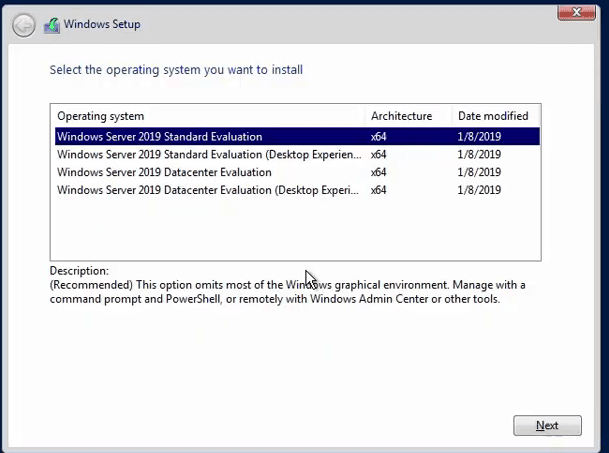
Step 4
here you can see two versions of the windows server, Standard and Datacenter. Select standard and next to continue.
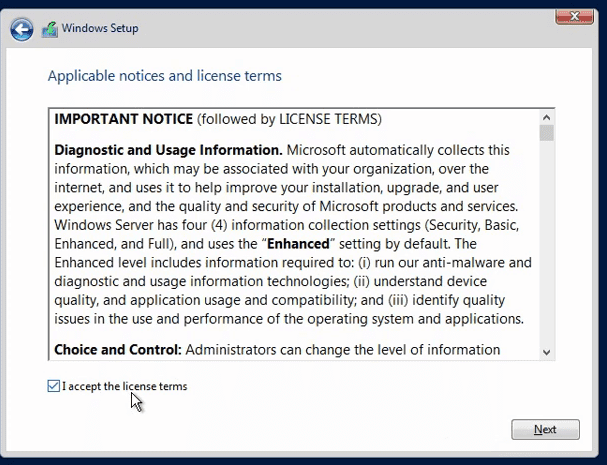
Step 5
To use it, you must accept the terms and conditions of Microsoft. Check the field and click on the Next button.
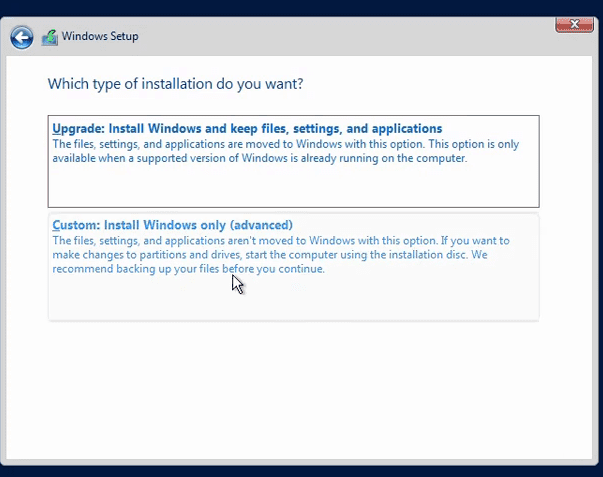
Step 6
For installation, you have two options: up-gradation and new installation. Suppose you have previously installed windows server 2012 or 2016 and want to upgrade to 2019. Choose the upgrade option, otherwise choose custom to install a new installation.
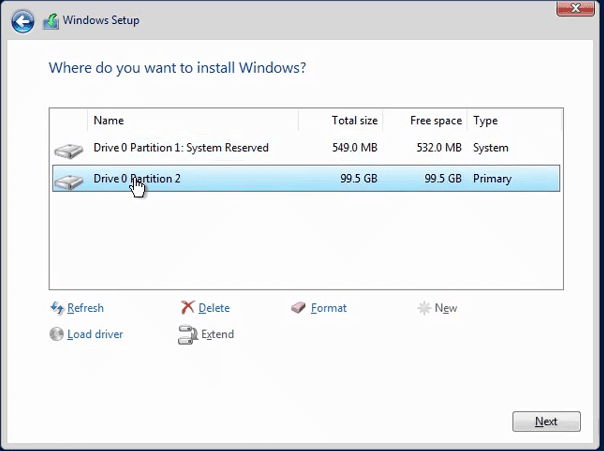
Step 7
Select the partition where you want to install its setup or create your partition by clicking on the new button. But make sure the disk space should be at least 32GB.
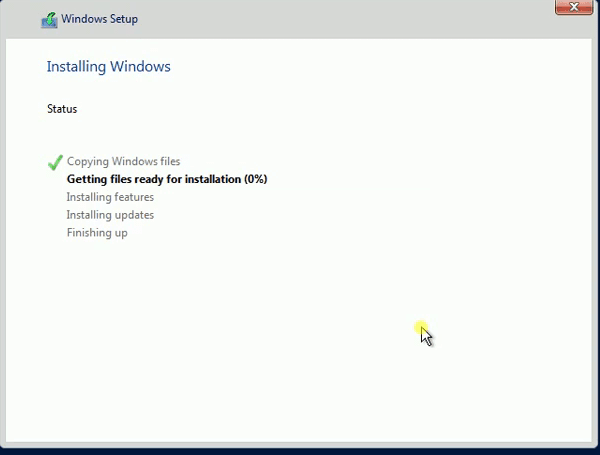
Step 8
Setup will start copying the windows server files and will take some time to finish the process. During the installation, your system will restart several times, so don’t worry about it.
Step 9
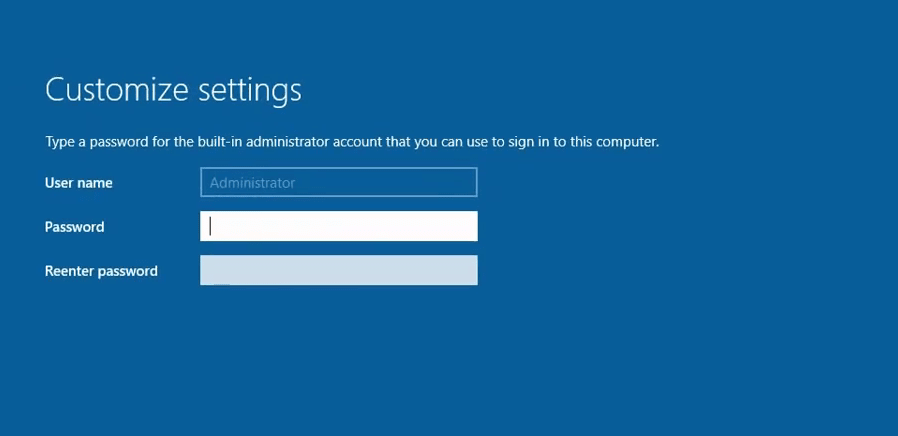
Create username and password for administrator and press finish button to finalize the setup. You only will be able to log in to the server using these credentials.
Step 10
Enter the administrator password, you have set in the previous step to log in.
Step 11
Finally, windows server 2019 is ready for use. Enjoy it.
Final Overview:
Installing a windows server is simple and easy. Download WS ISO file from official Microsoft and burn in USB. And then follow all steps mentioned in the post.
FAQ:
Which new features are included in Windows server 2019?
Many new features are included in the 2019 version. Some of them are:
Storage Migration Service
Sometimes it would help if you migrated the server, such as changing hardware or switching on a virtual machine in many cases. This tool is specially made for that. With this GUI tool, you can easily migrate the server to the new version. This tool helps to get rid of a different headache usually faced while migrating OS. You can switch back to an old version like Windows server 2012, 2008 with simple clicks.
System Insight
This fantastic tool provides a complete detailed report of the server, such as system performance, resources being currently used, and information on how many issues have been addressed in the system. And also help to predict storage and networking requirements to be needed in the future after analyzing previous data. System Insight is based on a machine learning model that gathers the data and finds a hidden pattern to provide a better insight report.
Windows Admin Center
WAC is a browser-based app to control and manage the server. Windows 10 and previous Windows versions, users can also install it without any additional cost.
Security
Security significantly has been approved in windows server 2019. Some of the core security features in the 2019 version:
Windows Advanced Threat Protection
ATP protects memory and kernel-level protection from threat, and if any threat or malicious action exists, they delete it.
ASR:
ASR stops or prevents files from entering the server that is infected with malware.
Network Protection:
NP provides internet security to protect the server from unsecured clients on the web and block untrusted clients.
Folder Protection:
This is folder lever protection to protect sensitive data from unwanted access. And especially provide solid security from a ransomware attack.
Support to Run Linux version Along with window server:
Now, the 2019 version provides a virtual machine shield to run different famous Linux distributions.
Encryption Based Network Security:
This feature makes secure data transfer on the network using DTLS techniques that encrypt data into packets. Information remains encrypted while transforming between virtual machines over the web. So, no one can access it.
For more information about new features in the latest version, visit the Microsoft official page.